Hello everyone! My name is Vigen Movsisyan, and I’m a Frontend Developer at QIC digital hub. In this article, I’ll share how we implemented Canvas technology, the problems it helps solve, what we’ve already accomplished, and our future plans.
In simple terms, Canvas is a “drawing board” that enables rendering and interactivity, allowing users to directly manipulate graphical elements. Throughout this article, I’ll refer to our project to demonstrate Canvas’s capabilities.
Note: The current version lacks a “Back” button — please use your browser’s back button to return to previous sections.
Now, let’s dive into the fascinating world of Canvas possibilities!
The first case (when we implemented Canvas) started with a business request: “Photos on our website take too long to load, and this significantly impacts user experience.”
This sparked an idea: “What if we compress images directly on the client side?” This approach could dramatically reduce loading times — and that’s where Canvas came into play.
export const compressImageFile = ( imageFile, imageQuality = 0.7, maxWidth = 800, maxHeight = 600) => { return new Promise((resolve, reject) => { const img = new Image() const objectURL = URL.createObjectURL(imageFile) img.src = objectURL img.onload = () => { const canvas = document.createElement('canvas') let width = img.width let height = img.height if (width > height) { if (width > maxWidth) { height *= (maxWidth / width) width = maxWidth } } else { if (height > maxHeight) { width *= (maxHeight / height) height = maxHeight } } canvas.width = width canvas.height = height const ctx = canvas.getContext('2d') ctx.drawImage(img, 0, 0, width, height) const type = imageFile.type canvas.toBlob((blob) => { const fileName = imageFile.name const compressedFile = new File([blob], fileName, { lastModified: Date.now(), type }) URL.revokeObjectURL(objectURL) resolve(compressedFile) }, type, imageQuality) } img.onerror = error => { URL.revokeObjectURL(objectURL) reject(error) } })}
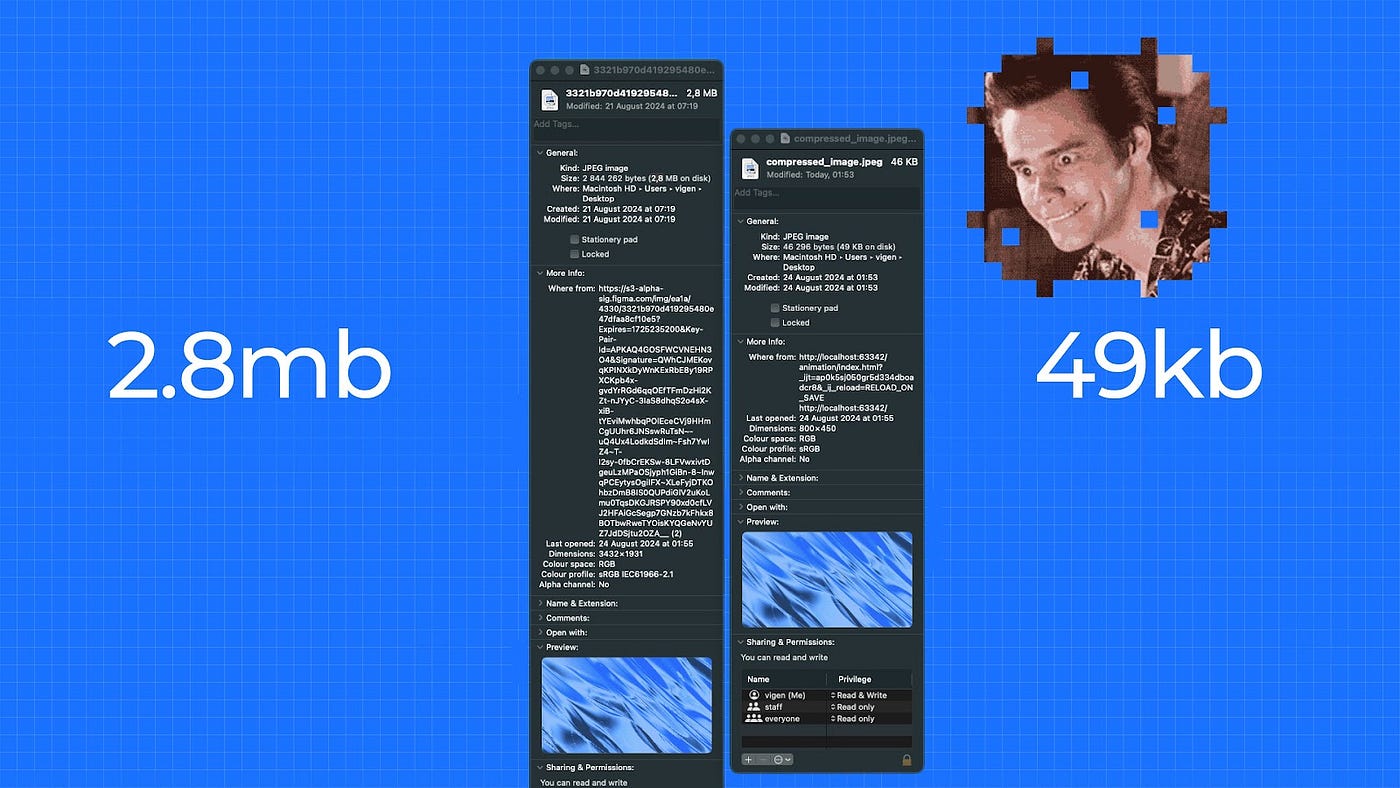
In one test case, the original image was almost 3 MB, but after compression, it was only 49 KB — a 57x reduction! Of course, if an image is already small (e.g., 40 KB), the difference won’t be as dramatic, but savings are still noticeable. Most importantly, this approach reduced image loading times from 16–18 seconds to just 2 seconds.
Vue implementation — available here.
Try image compression yourself:
There are also ready-made libraries that allow implementing compression on Canvas in a similar way:
However, as practice shows, even a custom lightweight Canvas function can handle most everyday image optimization tasks.
At some point, I had the idea to use Canvas for a small gaming element — allowing users to pass the time in case their internet suddenly drops. After all, when a connection fails, people often blame the developers or the service itself. A simple mini-game helps “soften” the negative experience and keeps users engaged in the app, even during temporary connectivity issues.
In my case, it’s a game where you control a car and try to avoid collisions. You can check out how it works via the link (Game).
<canvas ref="canvasRef" class="game-canvas" :width="canvasSize.width" :height="canvasSize.height" />
Get the context:
const context = (canvasContext.value = canvasRef.value!.getContext('2d')!);
Upon component mounting, we immediately acquire the 2D rendering context (canvasContext.value) to manage drawing operations.
During each game loop iteration (gameLoop), we perform a full Canvas clear to avoid object overlap artifacts.
const clearCanvas = () => { canvasContext.value!.clearRect( 0, 0, canvasContext.value!.canvas.width, canvasContext.value!.canvas.height ); };
In our case, these are cars and the road. Let’s start by drawing the cars.
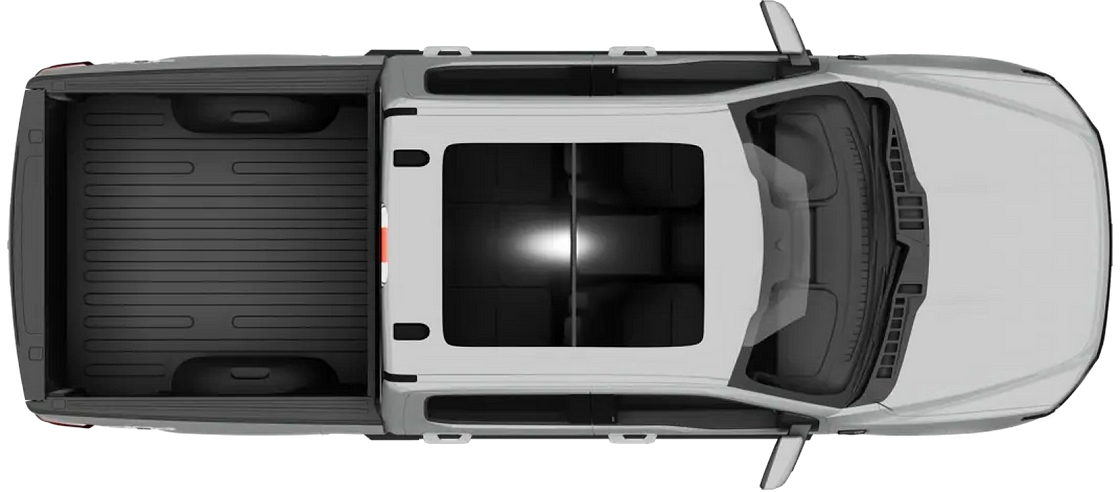
class Car { context: CanvasRenderingContext2D; x: number; y: number; width = 0; height = 0; velocityX = 0; speed = PLAYER_CAR_SPEED; friction = PLAYER_CAR_FRICTION; image: HTMLImageElement; constructor (context: CanvasRenderingContext2D, imageSrc: string, isMobile: boolean) { this.context = context; this.x = 0; this.y = 0; this.image = new Image(); this.image.src = imageSrc; this.image.onload = () => { const scale = isMobile ? CAR_SCALE_MOB : CAR_SCALE; this.width = this.image.width * scale; this.height = this.image.height * scale; }; }move (x: number, y: number): void { this.x = x; this.y = y; } draw (): void { if (this.width && this.height) { this.context.drawImage(this.image, this.x, this.y, this.width, this.height); } }}
Let’s move forward with drawing the game road (drawRoad)
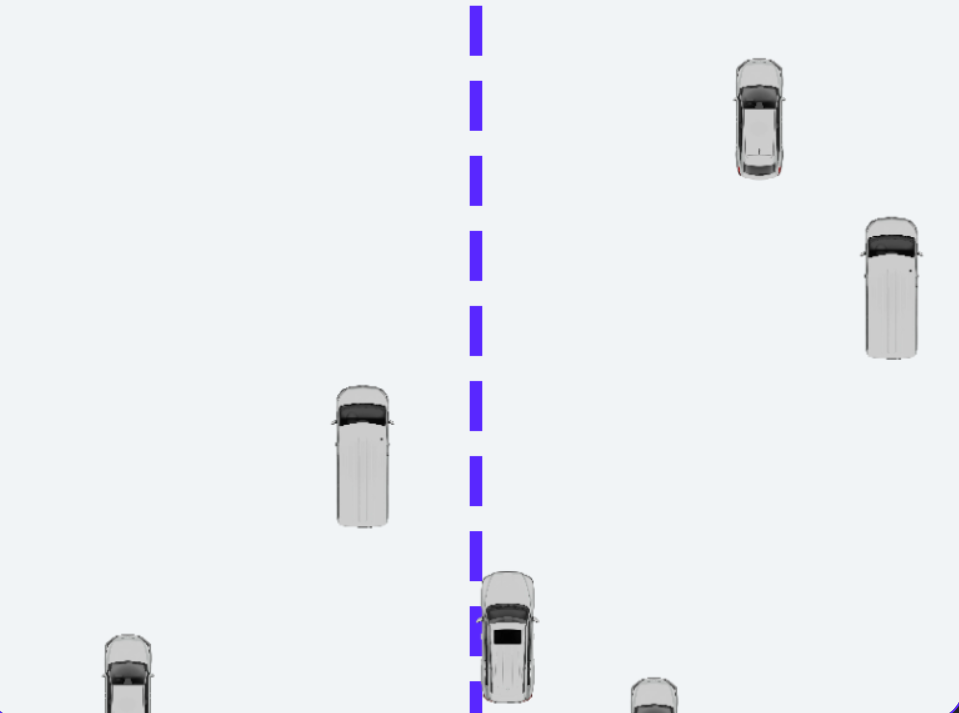
1. Background setup: Fill with light gray (#f1f4f6) as road base
2. Center line: Rendered with setLineDash for dashed pattern
3. Animation: roadOffset enables vertical scrolling for movement illusion
const drawRoad = () => { const context = canvasContext.value!; const roadWidth = context.canvas.width; context.fillStyle = '#f1f4f6'; context.fillRect(0, 0, roadWidth, context.canvas.height); roadOffset.value = (roadOffset.value + gameSpeed.value + 1) % (ROAD_LINE_HEIGHT + ROAD_GAP_HEIGHT); context.strokeStyle = '#5927ff'; context.lineWidth = ROAD_LINE_WIDTH; context.setLineDash([ROAD_LINE_HEIGHT, ROAD_GAP_HEIGHT]); context.beginPath(); context.moveTo(roadWidth / 2, roadOffset.value - (ROAD_LINE_HEIGHT + ROAD_GAP_HEIGHT)); context.lineTo(roadWidth / 2, context.canvas.height); context.stroke(); };
const gameLoop = () => { clearCanvas(); drawRoad(); updateEnemyCars(); isMobile.value ? updatePlayerCarInMobile() : updatePlayerCar(); handleCollisions(); requestAnimationFrame(gameLoop); };
const handleCollisions = () => { enemyCars.value.forEach((enemyCar) => { const player = playerCar.value!; const hasCollisionX = (enemyCar.x > player.x && enemyCar.x < player.x + player.width) || (enemyCar.x + enemyCar.width > player.x && enemyCar.x + enemyCar.width < player.x + player.width); const hasCollisionY = enemyCar.y + enemyCar.height > player.y; if (hasCollisionX && hasCollisionY) { if (window.navigator && window.navigator.vibrate) { window.navigator.vibrate(200); } gameSpeed.value = 0; crashMessage.value = 'Don\'t worry, we cover such cases with insurance.'; } });};
gameLoop ();gameSpeedIncreaseInterval = setInterval(() => { const acceleration = isMobile.value ? 0.1 : 1; gameSpeed.value = Math.min(gameSpeed.value + acceleration, MAX_GAME_SPEED); }, SPEED_INCREMENT_INTERVAL_MS);
const resumeGame = () => { const context = canvasContext.value!; playerCar.value!.move( context.canvas.width / 2, context.canvas.height - PLAYER_CAR_START_Y_OFFSET ); playerCar.value!.velocityX = 0; enemyCars.value.forEach((enemyCar) => { enemyCar.move( getRandom(0, context.canvas.width), getRandom(-context.canvas.height, 0) ); }); gameSpeed.value = INITIAL_GAME_SPEED; crashMessage.value = ''; };
onUnmounted(() => { document.body.removeEventListener('keydown', handleKeydown); document.body.removeEventListener('keyup', handleKeyup); clearInterval(gameSpeedIncreaseInterval); });
When the component is removed from the DOM, we remove all keyboard event listeners and stop the acceleration interval. This prevents memory leaks and conflicting events when switching components or navigating to other pages.
The entire game is built around Canvas: background, player/enemy cars, animations, and collision detection. Vue provides reactivity and convenient state management (like tracking key presses or joystick position), while Canvas handles the actual graphics rendering. This creates a simple yet visual game demo that easily adapts to different devices.
Recently when demonstrating this game internally, both our Product Owner and Team Lead approached me about integrating similar gamification into our actual project.
The current version is far from production-ready — it serves as a functional demo showing how the concept could work. You can try the game via the link .
The game code is available here.
Another Сanvas сapability: a digital drawing board. We’ve implemented this feature in two practical formats:
This drawing functionality unlocks creative potential and boosts engagement across user scenarios.
const canvas = ref <HTMLCanvasElement | null>(null);сonst isDrawing = ref <boolean> (false);сonst context = ref <CanvasRenderingContext2D | null> (null);сonst lastX = ref<number>(0);сonst lastY = ref <number>(0);
const getCoordinates = (event: MouseEvent | TouchEvent): { x: number, y: number } => { if (event instanceof MouseEvent) { return { x: event.offsetX, y: event.offsetY }; } else if (event instanceof TouchEvent && canvas.value) { const rect = canvas.value.getBoundingClientRect(); const touch = event.touches[0]; return { x: touch.clientX - rect.left, y: touch.clientY - rect.top, }; } return { x: 0, y: 0 };};
const startDrawing = (event: MouseEvent | TouchEvent) => { if (!canvas.value || !context.value) return; isDrawing.value = true; const { x, y } = getCoordinates(event); [lastX.value, lastY.value] = [x, y];};
const draw = (event: MouseEvent | TouchEvent) => { if (!isDrawing.value || !canvas.value || !context.value) return; event.preventDefault(); const { x, y } = getCoordinates(event); context.value.strokeStyle = 'white'; context.value.lineJoin = 'round'; context.value.lineCap = 'round'; context.value.lineWidth = 5; context.value.beginPath(); context.value.moveTo(lastX.value, lastY.value); context.value.lineTo(x, y); context.value.stroke(); [lastX.value, lastY.value] = [x, y];};
3. stroke() renders the line
4. Update lastX, lastY so the next segment starts where the previous one ended.
const stopDrawing = () => {isDrawing.value = false;};
Resets the isDrawing flag when the user releases the mouse button/touch or moves outside the <canvas>.
Canvas Drawing Summary:
Full code available here
Try drawing here (Drawing)
Voice assistants have become an integral part of our lives, and in the near future, users may prefer dictating data rather than typing it manually. Imagine speech recognition technology advancing to the point where, while using our product, a customer can simply speak into a microphone — and the system automatically transcribes their speech into text and populates form fields.
To make this process more engaging and visually intuitive, I implemented sound wave visualization using Canvas. As the user speaks, the wave “dances” in real time, reflecting voice timbre and volume — an interface pattern you’ve likely encountered before.
For details on requesting microphone permissions and audio capture implementation, see our repository. Below, I’ll focus specifically on rendering the sound waves.
const canvas = ref<HTMLCanvasElement | null>(null);const isListening = ref<boolean>(false);let audioContext: AudioContext | null = null;let analyser: AnalyserNode | null = null;let microphone: MediaStreamAudioSourceNode | null = null;let dataArray: Uint8Array;let animationFrameId: number | null = null;
const drawVisualizer = () => { if (!canvas.value || !analyser) return; const canvasCtx = canvas.value!.getContext('2d'); if (!canvasCtx) return; const width = canvas.value.width; const height = canvas.value.height;//Configuring the AnalyserNode analyser.fftSize = 2048; const bufferLength = analyser.frequencyBinCount; dataArray = new Uint8Array(bufferLength);//The function to be called every animation frame const draw = () => { if (!canvas.value || !analyser) return; analyser.getByteTimeDomainData(dataArray);//Clear the canvas and fill with background: canvasCtx.clearRect(0, 0, width, height); canvasCtx.fillStyle = 'rgb(200, 200, 200)'; canvasCtx.fillRect(0, 0, width, height);//Line Drawing Parameters canvasCtx.lineWidth = 2; canvasCtx.strokeStyle = 'rgb(0, 0, 0)'; canvasCtx.beginPath();//sliceWidth - Step Width Between Points const sliceWidth = (width * 1.0) / bufferLength; let x = 0;// Iterating Through the Array and Drawing Wave Oscillations for (let i = 0; i < bufferLength; i++) { const v = dataArray[i] / 128.0; const y = (v * height) / 2; if (i === 0) { canvasCtx.moveTo(x, y); } else { canvasCtx.lineTo(x, y); } x += sliceWidth; }// Terminate the Line at Mid-Height canvasCtx.lineTo(canvas.value.width, canvas.value.height / 2); canvasCtx.stroke();//Make the next frame: animationFrameId = requestAnimationFrame(draw); }; draw();};
Regarding sound visualization using Canvas, we can summarize the following:
You can try the feature here (Voice Visualizer).
Check out the code implementation here.
Canvas enables the creation of 3D graphics and animations. For example, the QIC App successfully uses 3D car models. While I haven’t deeply explored this myself, it’s important to understand that Canvas (particularly via WebGL) truly makes such features possible. However, if fast loading times are critical, it’s sometimes wiser to use a regular video instead. Interactive 3D elements should only be added when truly necessary — possibly with the help of a library like Three.js.
I once considered loading a large GIF animation, but its size reached 800 MB. To avoid overloading the page, I took a different approach and embedded a 3D model (see it here) via an iframe. If you follow the link, you can see just how powerful web-based 3D graphics can be.
You’ve probably heard of Awwwards — a platform that showcases award-winning web projects, often featuring parallax effects, 3D, and unique visual techniques. I highly recommend checking it out for truly inspiring examples.
At QIC, we leverage Canvas for a variety of tasks: optimizing image loading speeds, creating interactive UI elements, developing game mechanics — and this is just the beginning. Canvas unlocks tremendous potential for us, ranging from subtle visual effects to complex animations, and even 3D model integration. I’m truly excited to explore new ideas and use cases we can implement in future projects.
How would you use Canvas? Share your ideas in the comments — together, we can push its capabilities even further!